Benford’s law with different units

22 09 2020

During a zoom trivia session (because you can’t let the virus win) Benford’s law came up.

This is the observation that the leading digits in many measurements in nature aren’t distributed evenly, there are many more 1s than 2s and the digits grow less prevalent as you go on.

I mentioned that the cool thing is that this holds up regardless of the unit of measurement used. If you measure the length of rivers in meters inches or furlongs you should be getting approximately the same distribution of leading digits.

A friend said this makes no sense, if we measure in units of half a meter, every river that had a length starting with one now starts with two and therefore there will be more twos than ones. The flaw in his logic is that half the numbers starting with one will start with two (those with the second digit being less than 5) and half will start with 3. Additionally any number that began with a digit greater or equal to 5 will now start with 1.

In fact, if we take the expected distribution given by Wikipedia and try to see how the distribution change if the measurement unit changes, we can see that it stays about the same[1].

I use the term multipliers here to refer to the resulting measurement, if the measurement unit is ⅛ of the original, the resulting value will be multiplied by 8.

Since each leading digit contributes to one or more digits, when the unit of measurement is changed to a multiple of the first, I thought it would be interesting[2] to plot this in a Sankey diagram.

I threw together a short Python script[3] to create the data:

grid = [None]*10
grid[0] = [0]*10
grid[1] = [0, 30.1, 17.6, 12.5, 9.7, 7.9, 6.7, 5.8, 5.1, 4.6]  # Seed data from wikipediea
epsilon = 0.001  # avoid floating point hassle


def msd(n) -> int:  # Most Significant Digit
    while True:
        tenth = n // 10
        if tenth == 0:
            return int(n)
        n = tenth


for i in range(1, 10):
    print(f"All [{grid[1][i]}] 1_{i}")

try:
    for multiplier in range(2, 10):  # 1 is the seed data
        grid[multiplier] = [0]*10
        for source_digit in range(1, 10):
            for numerator in range(multiplier):
                digit = msd(multiplier * (source_digit + numerator/multiplier) + epsilon)
                gain = grid[multiplier-1][source_digit] / multiplier   # Use the previous multiplier's values (this makes sense for Sankey)
                grid[multiplier][digit] += gain
                print(f"{multiplier-1}_{source_digit} [{gain}] {multiplier}_{digit}")

    for i in range(1, 10):  # Print commented out final data
        print(f"' {i}: {grid[i]} ({sum(grid[i])})")

except Exception as ex:
    print(f"Got exception {ex}")

After plugging the output into sankeymatic.com, and fiddling with the order of the nodes[4] I was able to get something that may be somewhat informative.

Legend: N_M – N is the multiplication factor, M is the leading digit

If you’re looking at this and have no idea what’s going on, consider measuring all the rivers in the world in meters then splitting them according to the leading digit, this is the idea behind Benford’s law and it’s the left most part of the diagram (All to 1_N). Now consider measuring in units of half a meter. Half the rivers that had a leading digit 1 will now have a leading digit 2 and half will have 3, so from 1_1 we split evenly to 2_2 and 2_3. Similarly all the rivers that were mapped to the 1_51_61_71_8 and 1_9 groups will now be mapped to 2_1.

Rinse and repeat.


[1] I was half expecting the numbers to be exactly the same but apparently Benford’s law is more of an observation than an actual law.

[2] I was wrong.

[3] I say I “threw together” to make you underestimate how much time I wasted on it.

[4] Sankeymatic was trying to be helpful and minimize the crossing of the streams.


Ref-count of numbers in Python

18 07 2019

Whenever I learn an new language I tend to gravitate towards the idiosyncrasies of that language. I’ve recently started working in Python and one of the funny things I’ve come across is that you can see how often numbers are currently used in the system.

numbers-ref-count

Since everything is an object in Python, and Python uses reference counting for memory management, you can see how often a number is currently referenced.

import sys

for i in range(-10, 50):
    print(f"{i}, {sys.getrefcount(i)}")

As you can see from the graph 0 is the most used number, there are bumps for powers of 2 and some small raises that I don’t find obvious (for example in the low twenties).

Additionally the empty string “” is the most used string (that I could find in any case).


When I put this code in an online Python compiler I got different results,  interestingly 1 was more in use than 0.


Image Based Testing with “Insight”

3 04 2019

Around 2015 I wrote a blog post for work. Since then the company was purchased by Micro Focus and the post has disappeared (probably due to branding issues). I’m re-posting it here (with minor changes) for future reference. Opinions expressed here are my own and do not represent those of Micro Focus or its entities.

Motivation

One of UFT’s main competitive advantages is the wide support for different technologies, in fact this is probably my most reused PowerPoint slides:

uft-technologies

But even after supporting all these technologies and more there is always a gap in our support (as can be seen between PeopleSoft and Chrome), there are always technologies that are either not common enough to justify putting development time into supporting or present too much of a technological challenge.

In order to bridge this gap UFT 11.50 introduced Insight, an image based way of doing automation. Insight uses an image in order to identify a test object and is fully integrated into UFT so it can leverage the full range of UFT capabilities such as Record, Learn and Visual Relations Identifiers to name but a few.

When creating a test we sometimes find that UFT gives good support for the whole application except for one or two little steps, these steps may make or break the ability to automate the whole application, in these cases we would recommend mixing traditional UFT tests with a couple of Insight steps thus getting the best of all worlds.

The power of Insight comes from the fact that it requires the bare minimum that any GUI system supplies, a graphical interface. This means that Insight can be used on unsupported technologies such as Flash or even on a remote desktop connection or a mobile device emulator.

For the rest of this post I will use Windows’ calculator to demonstrate Insight’s capabilities. Please don’t allow the simplicity of the examples distract you from the wide scope of applications that can be automated with Insight.

The Test

Usually UFT is able to give test objects descriptive names, this is done by looking at the test objects properties and using some heuristics in order to decide which properties most likely contain a value that will convey meaning to the test maintainer. However an InsightObject’s description is based on an image, UFT has no additional insight (oh the irony) into the properties of the test object and is therefore not able to give the object a descriptive name. In order to prevent the test containing nothing but objects similar to InsightObject_2 UFT inserts the test object’s image into the script, this makes the test understandable and maintainable.

script-view

Tip: Double clicking the image will open the test object in the object repository

Recording

In order to activate Insight during a record session change the Recording Mode selection to Insight Recording

insight-recording

While in Insight Recording mode mouse actions will create an Insight step, keyboard actions on the other hand will create WinObject.Type steps. The reasoning behind this is that when a mouse event occurs there is a point associated with it and UFT can try to understand what object was acted upon. Typing presents more of a problem since UFT cannot, in general, determine which object has focus, therefore the text is sent to the toplevel window which currently has focus.

Window("Calculator").WinObject("Text").Type "3"

The InsightObject does support the Type operation which can be used during test design to move focus to a specific InsightObject before typing.

Test Maintainance

Part of the power of Insight is that it captures an image that gives a good representation of the test object in question, this goal is hindered by the fact that many UI elements nowadays change their appearance when interacted with. If Insight would capture the image of the UI element in its hovered-over state then it will not be able to find it during test run since the element is currently not hovered over.  For this reason, when recording, Insight captures several images and determines which is the most appropriate to use according to some heuristics. There are some cases in which Insight guesses wrong (either about which image to choose or about the rectangle of the UI element) in these cases you can change the image used by clicking the Change Test Object Image button.

change-object

This opens an editor that lets you change which image to select form the image history, the size and location of the rectangle, exclude areas and the click point (for more details see UFT’s documentation).

editor

Exclude Areas

There are cases in which a UI control contains areas which change without affecting the functionality of the control and therefore detract from the ability to use the image for purposes of identification. Such areas may be randomly changed (such as advertisements), dynamically generated (e.g. weather forecasts) or contain text which is localized to different languages. By adding Excluded Areas to the image we can specify that only parts of the captured image should be matched against the application and the other areas can safely be ignored.

exclude

Similarity

Applications tend to change over time, for this reason Insight does not use simple image matching, instead Insight looks for controls that are similar to the image in the description. The best match is always used, however there is a threshold under which images are not considered to match. If you wish to change this threshold value you can add the similarity property to the InsightObject’s description.

Descriptive Programming

Insight can be used with descriptive programming as well as via the Object Repository, in order to use descriptive programming supply a path to an image file as the ImgeSrc property of the test object.

Window("text:=Calculator").InsightObject("ImgSrc:=C:\img.png")

The following image file formats are supported: PNG, BMP, GIF and JPEG.

Conclusion

I hope this introduction to Insight object identification provides enough information on how, why and when you should start using this feature.


Improve your UFT web tests by adding container objects

6 01 2019

In 2015 I wrote a blog post for work. Since then the company was purchased by Micro Focus and the post has disappeared (probably due to branding issues). I’m re-posting it here (with minor changes) for future reference. Opinions expressed here are my own and do not represent those of Micro Focus or its entities.

Back in 2013 I wrote about the “web test object model in UFT”, in which I said:

Under the Frame (or Page) object, all the web test objects (Link, WebButton, etc.) are siblings.  This isn’t how they appear in the actual HTML though – the actual elements in an HTML document are typically nested in a deep hierarchy.

There’s good reason for UFT to flatten the hierarchy (as the post elaborates) and it’s still mostly true. However beginning with UFT 12.50 we’ve added the capability to enable UFT to add another level in the test object hierarchy.

Glossary: we’ll call an object that adds a level in the hierarchy a container object since it contains other test objects.

The motivation for this is to allow you, the test engineer, to add logical grouping to your web test objects. This has two advantages.

  • Improved test maintainability and readability – The objects are easier to find in the object repository and neighbouring objects in the application will be close by in the object repository.
  • Increased test robustness – Since the description is relative to the test object’s parent, we’re less likely to need to resort to using assistive properties or ordinal identifiers to identify an object (as mentioned in the aforementioned post).

This ability isn’t added to the built-in web test objects. Instead it is meant for Web Extensibility developers in order to provide better support for their application since they (you) are the people best qualified to know what constitutes a logical partition of the web page.

Now don’t be scared by this being Web Extensibility, it’s quite simple to create a new control that helps partition your page. This post will show how it can be done.

Executive summary: add IsContainer=”true to your extensibility object.

Any Web Extensibility object can be a container and the first thing to decide is what functionality we want this object to have. In some cases the container object has no independent functionality and its only purpose is to group other objects. For simplicity, this is the assumption we will make. However keep in mind that these container objects are fully fledged test objects and can contain operations and properties if it makes sense for them to do so.

Example

We’ll use reddit’s login dialog as an example.

reddit

The login dialog is made up of three areas:

  • Sign up – For people who don’t yet have an account
  • Log in – For people who already have an account
  • General – Stuff that isn’t specific to either of the previous categories

If we learn the objects on this page we will get the following test objects object repository:

Before-mappings

There are several problems with this Object Repository:

  • You can see that we’re using ordinal identifiers for the user edit field. This makes the test less robust since the index of an element may change due to simple UI changes in the application even if the functionality hasn’t changed (for example if Log in is moved to the left of Create a new account).
  • It’s hard to know which element a test object refers to (user user_2).
  • Test objects that are adjacent in the Object Repository are not necessarily related or close together in the actual web application.

Web Extensibility allows us to define new test objects and map HTML elements to them. We’ll take advantage of the FORM element pictured here.

DOM

Usually UFT ignores FORM elements since UFT simulates real user actions and people don’t directly interact with forms. However, we’ll define a simple test object called EgForm which will be used for logical grouping of the test objects it contains.

After implementing EgForm we will get the following Object Repository which contains two EgForm objects, one called login and the other called register:

after-mappings

Here we can see that the Object Repository’s contents reflect the layout and functionality of the site, objects are easier to find and the description doesn’t rely on ordinal identifiers.

The advantages of the second Object Repository are a bit more obvious when you colour code each test object according to the location of the test object in the site.

Compare

The same hierarchy is generated both by the learn feature and recording.

script

Implementation

Here we’ll learn how to create a simple extensibility project called “Example” which can then be loaded in the Add-In Manager:

Addin manager

You can see the entire implementation on github.

We define a new test object by defining a test object XML and placing it under UFT’s installation directory in dat\Extensibility\Web (this XML is based on the schema in dat\ClassDefinitions.xsd). For more information see the UFT Test Object Schema topic in help\Extensibility\WebExtensibility.chm.

Defining the Test Object

The first thing we need to do is describe the test objects we’ll be creating. In this case we’re only introducing a single test object.

<?xml version="1.0" encoding="utf-8"?>
<TypeInformation PackageName="Example" AddinName="Web" xmlns:xsd="http://www.w3.org/2001/XMLSchema" xmlns:xsi="http://www.w3.org/2001/XMLSchema-instance" xsi:noNamespaceSchemaLocation="..\..\ClassesDefintions.xsd">
  <ClassInfo Name="EgForm" GenericTypeID="Form" BaseClassInfoName="WebElement">    
    <Description>A form.</Description> 
    <IdentificationProperties>
      <IdentificationProperty Name="html id"  ForDescription="true"	 />
      <IdentificationProperty Name="html tag" ForVerification="true" />
    </IdentificationProperties>
  </ClassInfo>
</TypeInformation>   

There’s nothing much in this file – a test object called EgForm with two identification properties. html tag since it’s always good practice to have the tag name in the description if possible and the html id. The ID of an element is often not a good candidate for description because there are many sites that generate new IDs every time the site is loaded but for the reddit example it’s a good identifier.

Identifying the new control

The toolkit XML is placed in a new folder under dat\Extensibility\Web\Toolkits and is based on the Toolkit.xsd schema which can be found there:

<?xml version="1.0" encoding="utf-8"?>
<Controls xmlns:xsi="http://www.w3.org/2001/XMLSchema-instance" xmlns:xsd="http://www.w3.org/2001/XMLSchema" xsi:noNamespaceSchemaLocation="..\Toolkit.xsd">  
  <Control TestObjectClass="EgForm" IsContainer="true">
    <Identification>     
      <Browser name="*">
        <HTMLTags>
          <Tag name="FORM" />
        </HTMLTags>        
        <Conditions type="IdentifyIfPropMatch">
          <Condition prop_name="id" expected_value=".+" is_reg_exp="true" />
        </Conditions>
      </Browser>
    </Identification>
    <Settings>
      <Variable name="default_imp_file" value="JavaScript\EgForm.js"/>
    </Settings>
    <Filter>
      <Learn learn_control="Yes" learn_children="Yes" />
      <Spy is_control_spyable="Yes" />
    </Filter>
  </Control>
</Controls>

The most important thing in this file (in the context of this post) is where it says IsContainer=”true”.  Once an object is designated to be a container it will automatically contain all the objects which are nested underneath it in the application’s HTML.

The rest of the file says that this works for all supported browsers and that we want to identify FORM elements who have a non-empty ID.

We also specify a JavaScript file (default_imp_file), we could do without it but I wanted our forms to have a nice name and not all be called EgForm.

Implementing the new control

The implementation of any new Web Extensibility test object is done in JavaScript, in our case we don’t want to introduce any new functionality such as recording or new functions.

All we want to do is override the default name of the test objects we’re creating. This is done by implementing a function called get_property_value which UFT uses in order to get the values of a Web-Extensibility object’s properties.

function get_property_value(name) {
    switch (name) {
        case 'logical_name':
            return _elem.id.replace(/-form$/, '');
    }
}

UFT uses logical_name in order to determine the name to use in the Object Repository, here we return the ID after removing any trailing -form (again this is what works for this example, pick what works for your application).

Some guidelines

Note the following when using this:

  • When recording or learning an object all its container ancestors will be added to the Object Repository. As a result, make sure that you don’t add redundant levels into the object hierarchy.
  • Often the rule for matching a container may match multiple HTML elements which represent the same logical container. Therefore make sure your rules are exclusive enough to prevent matching multiple objects when only one is expected.
  • Keep in mind that excessively deep object hierarchies present their own problems, only add containers when it makes sense to do so.

Try it out

Please go ahead and try out this new feature in UFT, I’m sure you’ll find it useful.

The source code used in this example is available in github, just place the dat folder under UFT’s installation folder and select the Example addin in the Add-In Manager. You can also find the two SORs shown in this post in the ExampleSORs folder.


Regular Expressions in UFT

5 11 2018

In 2013 I wrote a technical blog post for work. Since then the company was purchased by Micro Focus and the post has disappeared (probably due to branding issues). I’m re-posting it here (with minor changes) for future reference. Opinions expressed here are my own and do not represent those of Micro Focus or its entities.

Regular expressions (regex) are a common feature in many programming languages and utilities, UFT also uses allows the use of regex for object identification but there are a couple of small twists that one should keep in mind.

Motivation

Why use regexs in the first place?

Regular expressions are useful an object’s property has a consistent pattern but the details may change over time. For example if you wanted to identify the price part of a product on your shopping site you would be ill-advised to use the actual price in the description.

repository-with-literals

One would prefer to have a description that won’t break the next time this item goes on sale

repository-with-regex

Tools

Some people, when confronted with a problem, think “I know, I’ll use regular expressions.” Now they have two problems.
– Jamie Zawinski

The problem with regexs is that they quickly descend into un-maintainability, while it can be pretty straightforward to write a regex it’s often very hard to read and understand an existing regex.

In order to help author and understand regexs UFT supplies the Regular Expression Evaluator (Tools -> Regular Expression Evaluator…)

evaluator

Which is also available from within the object repository’s value configuration editor (along with a regex cheat sheet)

cheat

There are many other tools for dealing with regexs, one of my favorites recently has been regex101.com which also breaks down and explains the regex it’s evaluating.

How UFT is different

When using a regex in a description, UFT does have a few differences from other tools

Case insensitive

UFT tests are based on VBScript which is a case insensitive language.

Dim Index
For index = 1 To 10
    Print INDEX
Next

People using a case insensitive language to write tests naturally expect all aspects of the test to be case insensitive. This is the reason that (in most) places UFT adds the case insensitive flag to regexs that are part of an object’s description.

Anchoring

As we saw in the Regular Expression Evaluator screenshot, a regex can match a substring in the middle of a longer string. This can cause problems in object identification since the text of a containing object will naturally contain the text of a contained object. For this reason regexs in description are anchored to the beginning and end. This is the equivalent of adding ^ at the beginning of the regex and $ at the end.

This means that “\$99\.” will not match “$99.99, if you want to ignore the cents you will have to add a wildcard “\$99\.\d*”.

Descriptive Programming

When using descriptive programming all values are regular expressions by default. The reasoning behind this is that the fact that you’re using descriptive programming probably indicates that the regular description as seen in the object repository is not working well for you in this situation, therefore the descriptions of your objects are probably dynamic and regular expressions will serve you better than string literals.

There are two ways to write descriptive programming:

Inline descriptive programming

Inline descriptive programming is when the property values are written as part of the test line that identifies the object

Browser("title:=HP.*").Refresh

In this case the property values are always regular expressions and there is no way to tell UFT to try and find a literal match

Using the Description object

One case use the Description object in order to specify an object’s description.

Set desc = Description.Create()
desc("title").Value = "HP.*"
Browser(desc).Refresh

In this case one can turn the regular expression functionality off by setting the property’s RegularExpression property to false.

meme

desc("title").Value = "This is a *plain* [old] string (not some fancy regExp?)."
desc("title").RegularExpression = False

Note that this allows you to use some values as regular expressions and some as literals.

Wait a minute…

Now if you’re a Smart Aleck (like I am) you may be thinking “wait a minute, in a previous post you described an optimization UFT uses for html tags and advised adding them to descriptive programming, wouldn’t a regex html tag nullify the html tag optimization?”

Explanation for non-Smart Alecks, if UFT tried to get a collection of elements from the browser using a regular expression value, it would not work since the browser API expects to get a plain string.

document.getElementsByTagName("T.") // does not return all 
                                    // TR, TD and TH elements

Since descriptive programming uses regular expression by default one might assume that this optimization is not available for descriptive programming users, however we realized this was the case and we check if the value of the html tag contains any regular expression characters, if it does not we treat it as a normal value and not as a regular expression.

In Conclusion

We saw how regular expressions in UFT differ from how they are used in other environments, these differences are:

  • Regular expressions are case insensitive
  • UFT expects to match the regular expression against the whole string and not just a substring

We also saw when and how the regular expressiveness of a value can be turned off.


Understanding the Web Test Object Model in Unified Functional Testing (UFT)

7 10 2018

In 2013 I wrote a technical blog post for work. Since then the company was purchased by Micro Focus and the post has disappeared (probably due to branding issues). I’m re-posting it here (with minor changes) for future reference. Opinions expressed here are my own and do not represent those of Micro Focus or its entities.

The terms QTP (QuickTest Professional) and UFT are used interchangeably.

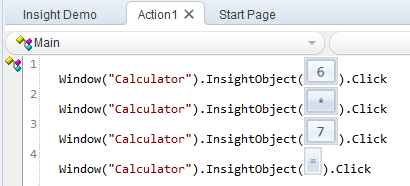
The meaning of the following script line should be obvious to anyone using UFT:

                Browser("B").Page("P").Link("L").Click

It says “Click link ‘L’ on page ‘P’ of the browser ‘B’.  But are things really that simple? Let’s drill down into each part of this step in order to understand why UFT’s designers chose to represent objects in this specific way.

Objectives of the Object Model

When deciding how to represent an object in an Application Under Test (AUT) several considerations are taken into account:

  • Robustness – A test should fail only if there is something wrong with the functionality of the AUT. Changes with no functional effects (e.g. font change) should not affect the test outcome.
  • Maintainability – If the AUT changes in a way that affects the test it should be easy to update the test in order to accommodate the changes in the AUT. This consideration gives rise to sub-considerations:
    • Readability -It should be obvious what a test does by reading it
    • Organization – Objects in the object repository should be organized in a logical manner so that it will be easy to find an object when looking for it.

Browser

What is a Browser?

Today, a Browser is a tab. But before tabs were introduced, a browser was a software application used to access the World Wide Web.  The object hierarchy was very simple:

Browser("B").Page("P")

With the advent of tabbed browsers, we had to decide how QTP should represent a tab. The naïve answer would be to just add another level to the object hierarchy:

Browser("B").Tab("T").Page("P")

But this has the following drawbacks:

  • Tests created on a tabbed browser will not work with a non-tabbed browser (even if only one tab is ever used)
  • Placing the tab under a specific browser is rarely a functional issue, as it breaks the robustness objective we discussed at the beginning of this article. A web page should be rendered identically whether it is created in a separate top-level window or as another tab

The drawbacks to having the Browser object represent a specific tab were mostly esthetic, but it was still the best option.

Because there may be some functional significance to having separate tabs in the same browser, we added the OpenNewTab, IsSiblingTab and CloseAllTab methods to the Browser test object. I’d like to know if anyone actually uses them… please leave me  a comment below to let us know if you do.

Nowadays, tabs can be ‘torn off’ from one browser instance and onto another.  So it seems clear that we made the correct decision.

Note: A minor compatibility issue that arose from this was that the window handle (HWND) for the Browser no longer refers to the top-level window.  Creating a regular Window test object with this HWND won’t allow you to call the Minimize or Move methods, or indeed call any other method which is available in Window but not in Browser.

A Browser’s ‘Description’

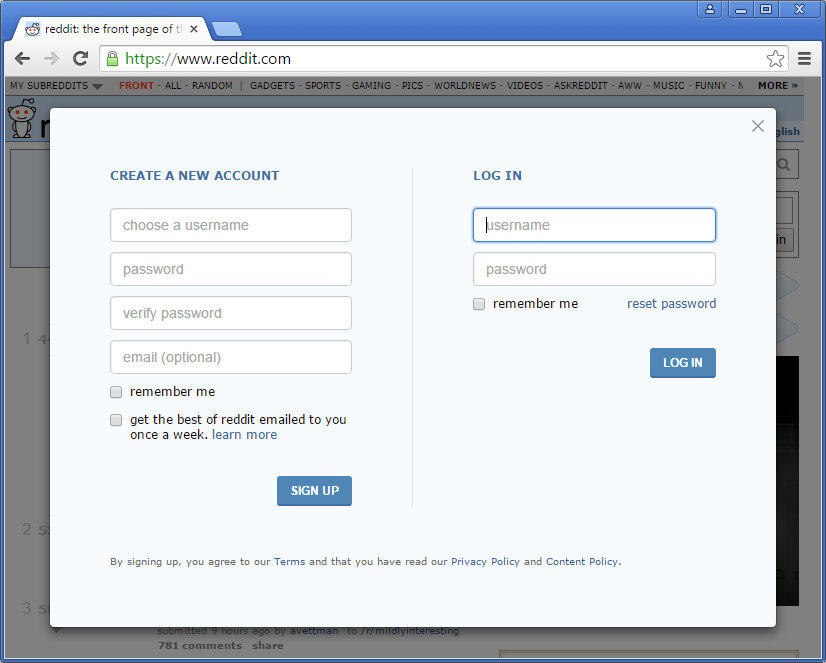
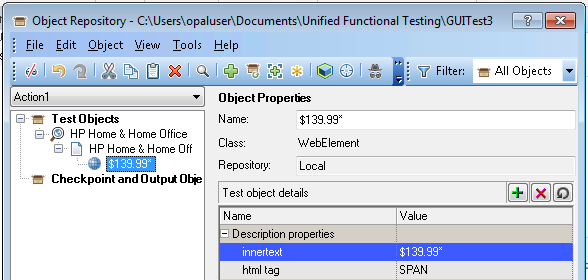
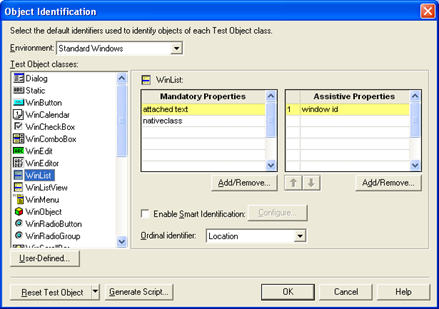
The object identification dialog doesn’t list properties for a browser’s description. This means that if more than one browser is open, the description will use an ordinal identifier, by default, creation time:

browser-desc

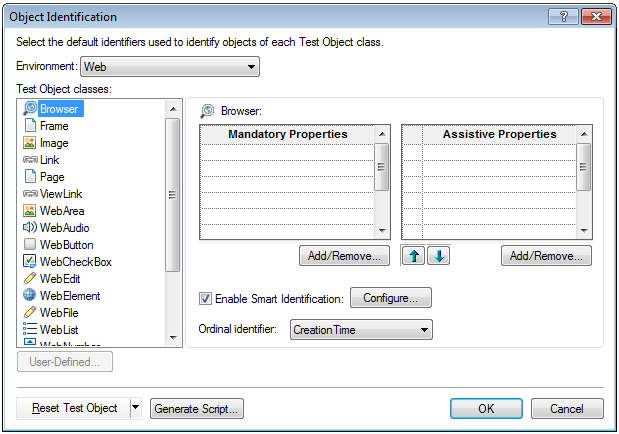
There isn’t actually a generic way to distinguish between browsers. Let’s say you open a browser on your homepage, navigate to your mail account to see what’s new, hang out in Facebook, and then navigate to your business application and start running tests.   If UFT used title as a default description property, the object repository would have many browser test objects – one for the homepage, one for mail, one for Facebook, etc. – and it would be very hard to find the correct browser.  This breaks the organization principle discussed earlier.

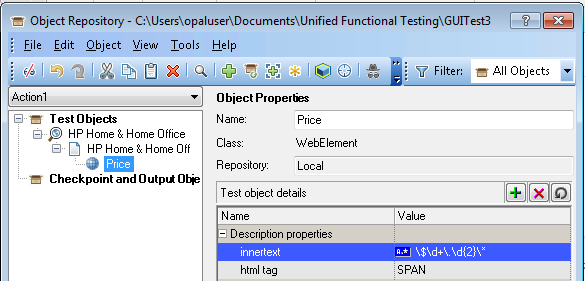
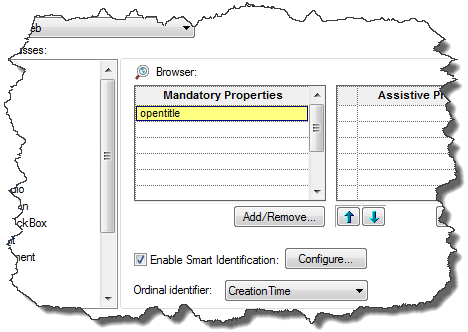
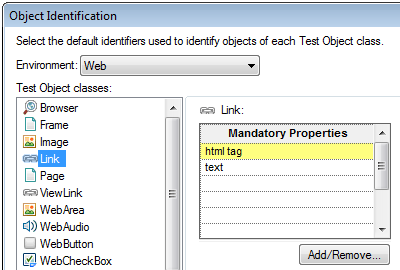
But if there is a consistent pattern to how you use your browsers, you can create a more robust description by using the opentitle, openurl or openedbytestingtool properties. For example, this screenshot shows how to use opentitle for all new browser objects, in the Object Identification dialog:

opentitle

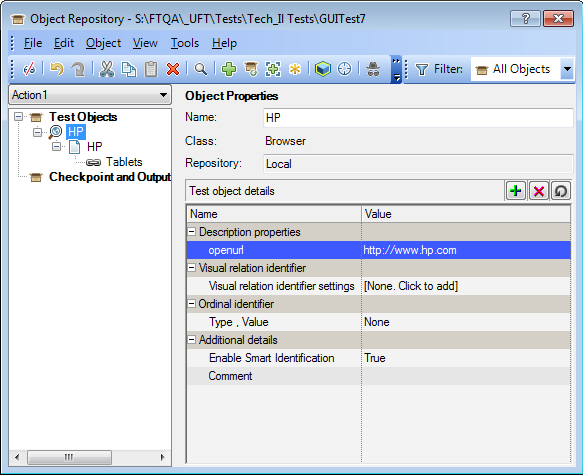
This screenshot shows how to use openurl for a specific browser:

openurl

And the following line of script shows how you can use descriptive programming to refresh a browser by its openurl property:

Browser("openurl:=http://www.hp.com").Refresh

Page

The Page object represents the top-level HTML document displayed in the current Browser. Since there can be only one top-level HTML document each Browser will have only one page. So why do we need another layer in the hierarchy? Why not just make the Browser object represent the top-level HTML document as well as the tab window?

The answer is to preserve the test maintainability objective we described earlier.  We determined that we don’t want to create a new Browser test object whenever the HTML being displayed changes, but this may lead to having tests with many dozens (hundreds?) of test objects under the Browser. In order to prevent this, we create an artificial split so that the controls that appear under the same Page test object logically belong together.

Thus if you have a login page and an accounts page you can find the username edit field without sifting through all the test objects that appear in the accounts page, because the appropriate controls are grouped logically.

Tip: You can modify the amount of page test objects created in UFT in Options > Web > Page/Frame Options

Frame

A Frame object represents an HTML document under the main object (inside a FRAMESET or IFRAME).  There’s nothing particularly interesting about this, so let’s move on…

WebElement(s)

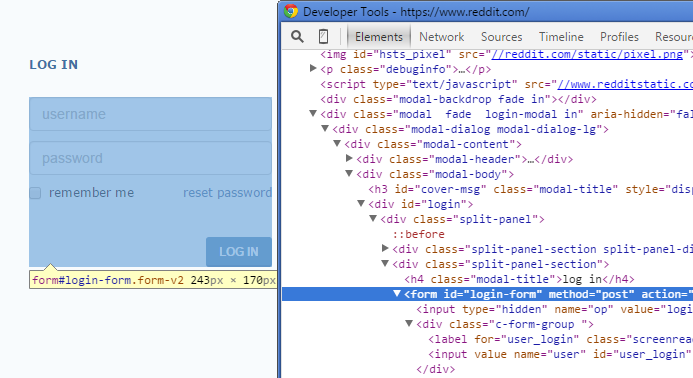
Under the Frame (or Page) object, all the web test objects (Link, WebButton etc.) are siblings.  But this isn’t how they appear in the actual HTML – the actual elements in an HTML document are typically nested in a deep hierarchy:

elem-dom

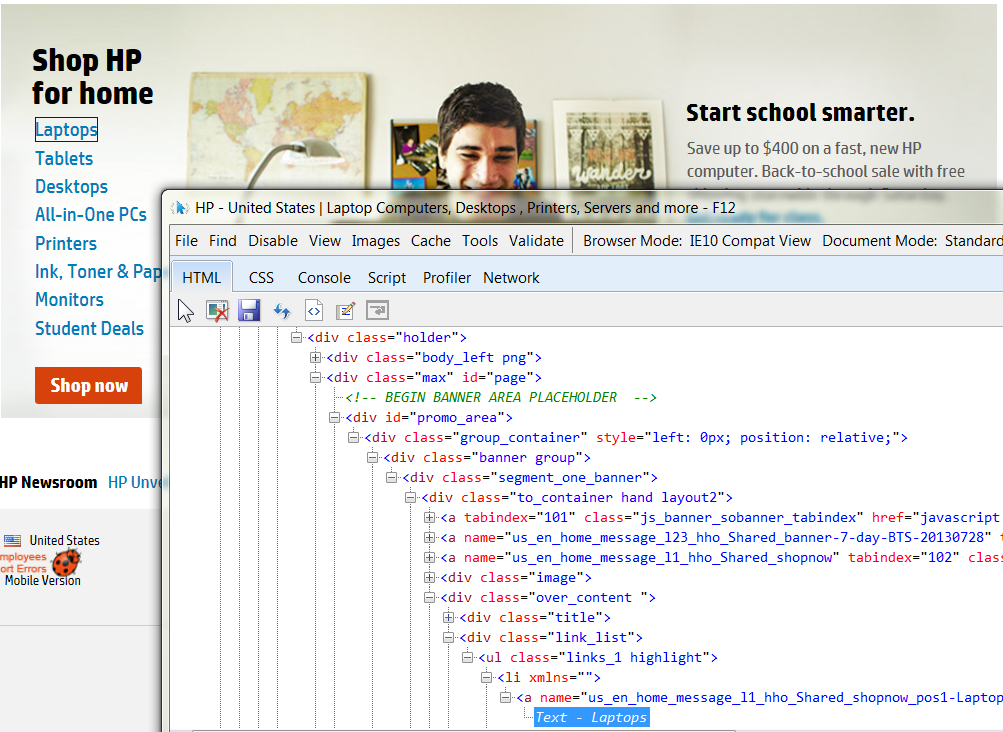
A typical web hierarchy as viewed with IE’s developer tools

Not only would adding all parent elements to the test make the test unreadable, it would also mean that the test will fail for every minor change in the HTML, and break our readability and robustness objectives respectively.

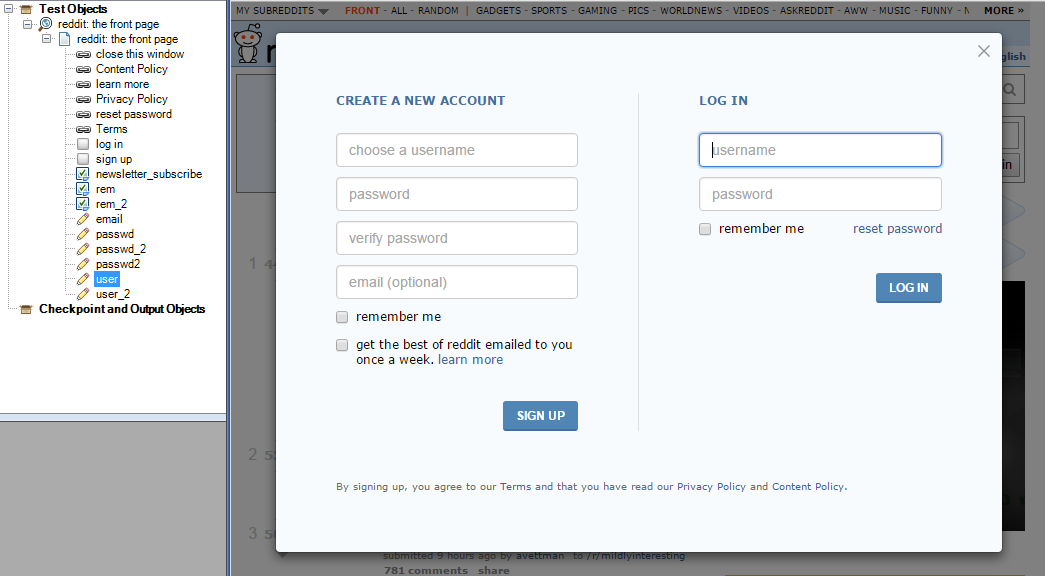
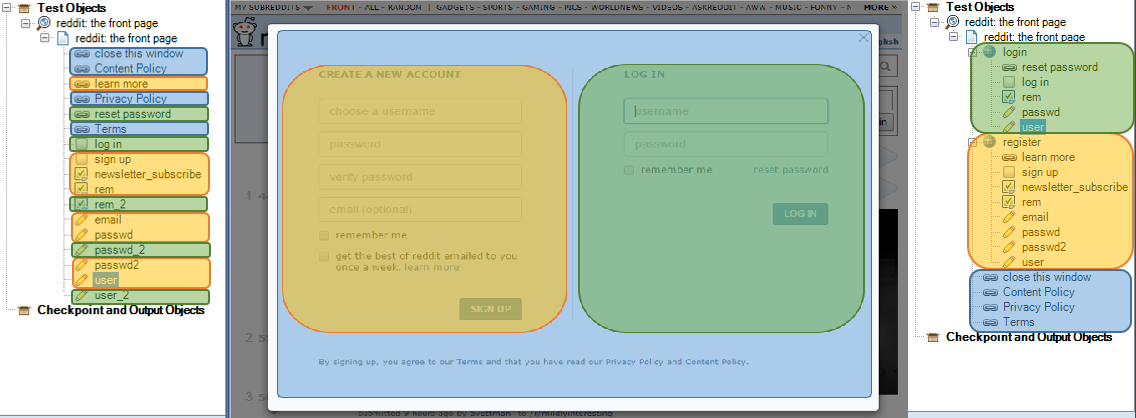
Although UFT flattens out the hierarchy when recording or learning an object, you can still create a hierarchy by yourself. If you drag a WebCheckBox (or any other object) under a WebElement in the Object Repository (or just nest them using descriptive programming) UFT will only look for the checkbox under its parent test object. This means that the description you give for the WebCheckBox only has to achieve uniqueness relative to its container, which can simplify things immensely for applications that contain many similar elements (such as the Add to cart link on an online store).  For example, the following screenshot shows how the HP Slate 7’s ‘Add to cart’ link on HP’s online store appears in the Object Repository Manager.  It is directly underneath the ‘Slate | HP Official Store’ page (other test objects were removed for clarity in the screenshot):

under-page

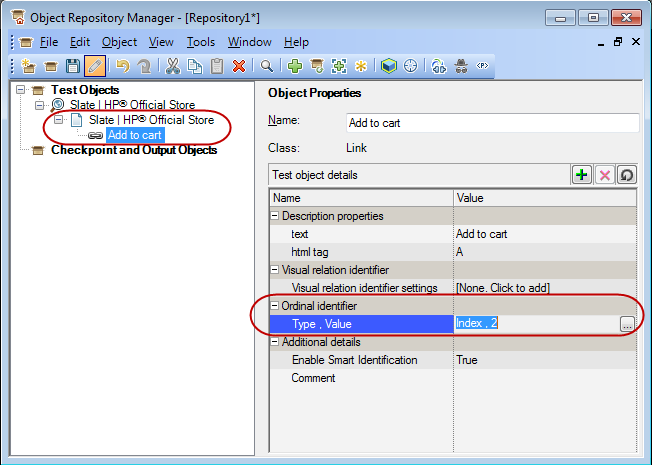
The ‘Add to cart’ link appears many times on the page, since there are many items which can be purchased.  This specific one is the third one (ie. having an index of 2) on the page.  UFT will have to find the first two links until it can locate the third one

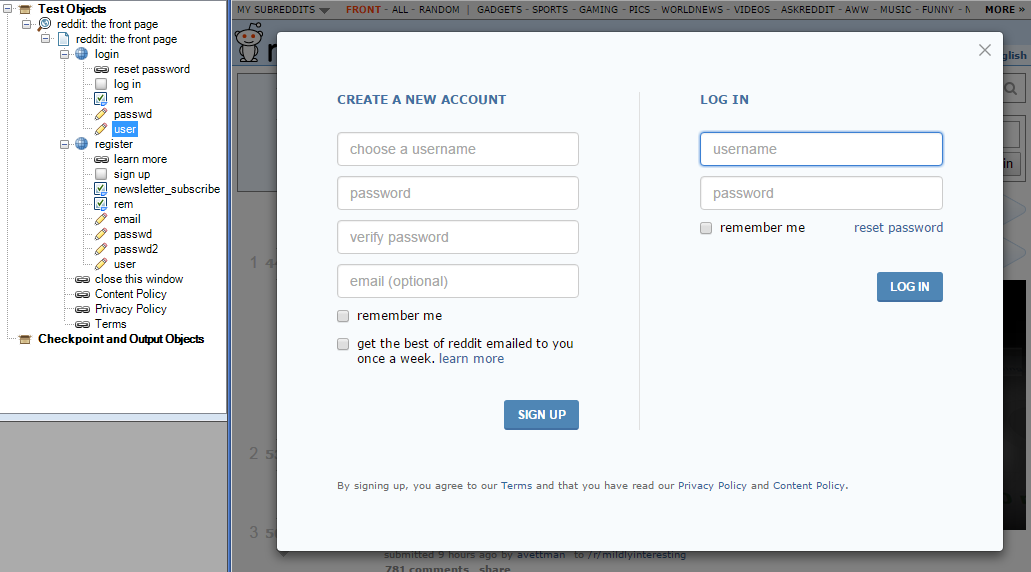
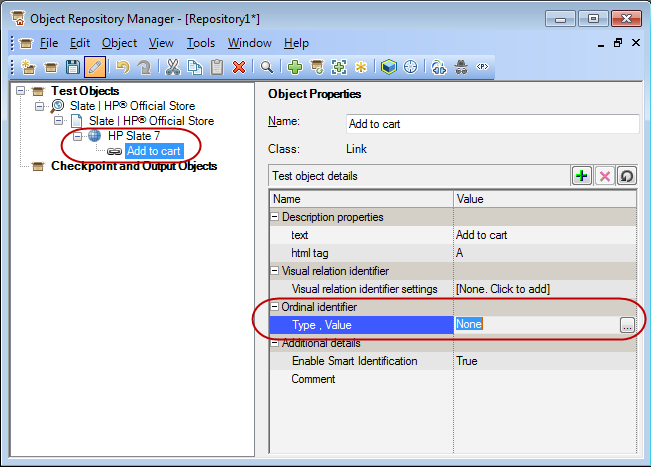
We can simplify it by adding the context element of HP Slate 7 to the hierarchy.  In this way, UFT only needs to locate the HP Slate 7, and then find the only ‘Add to cart’ link in the context of the HP Slate 7.  Since there’s only one link, we don’t even need the ordinal identifier:

under-item

HTML Tag

By default, UFT uses the html tag property as part of the description of all web test objects, even those for which it’s pretty obvious what the tag name will be.

tagName

The reason for this is that in order to identify a test object UFT must check all the elements on the page to see whether they fit the description, and this can be slow for big pages with thousands of element.  But browsers support getting the elements of a specific tag, and if UFT can use this function it can perform the search on far fewer elements. Because the html tag is part of the description by default you don’t usually have to think about it.  But if you change an object’s description (in the object repository or in the object identification dialog) you should keep this in mind.  If you use descriptive programming and you’re seeing that performance is a bit slow, consider adding the html tag to the description.

Note to WebExtensibility authors:  Consider adding the html tag property to the description of new types.

In Conclusion

I hope that after reading this post you have a better understanding of why UFT represents controls the way it does (at least in the Web addin). Some things that might have seemed arbitrary should now make some sense. You may have even picked up a tip or two that will help you improve your web tests!


How UFT Identifies Objects

20 09 2018

In 2010 I wrote a technical blog post for work. Since then the company was purchased by Micro Focus and the post has disappeared (probably due to branding issues). I’m re-posting it here (with minor changes) for future reference. Opinions expressed here are my own and do not represent those of Micro Focus or its entities.

The terms QTP (QuickTest Professional) and UFT are used interchangeably.


Note: The following describes the inner workings of QuickTest, it is intended to help people understand how things work but may change in future versions and shouldn’t be depended on.

QuickTest Professional’s bread and butter is identifying controls in the application being tested and it faces a tough decision since there are two directions in which one can optimize.

  • Optimize for speed
  • Optimize for robustness

Unfortunately one usually comes at the price of the other.

In order to alleviate this problem QuickTest has two concepts called description and runtime ID which are used together in order to achieve the best of both worlds.

Description

You should be familiar with the method QuickTest uses to identify Test Objects, this is a set of property/value pairs which (given the Test Object’s parent) describe an object uniquely.

object identification dialog

This description can be used to describe a control robustly so that it will still match the correct control even when run in a different environment and in different builds of the application. However finding the object that matches this description may be slow.

Runtime ID

A runtime ID is a way to quickly identify a control in the application being tested, the actual implementation changes according to the technology in question but first a bit of background.

In Microsoft Windows each control has a Window which is identified by a handle (known as HWND for “Handle to WiNDow”). All the Windows APIs use HWNDs to access controls and this method is very fast. However the HWND must be considered a “black box” you can’t assume anything about its value since Windows assigns each control an HWND from an internal pool and the value will change every time the application is run. This makes an HWND the perfect match to be the runtime ID of Win32 controls, for example a WinButton Test Object’s runtime ID may be its HWND.

Combining the Two

The characteristics of runtime IDs and descriptions are summarized in the following table:

  Runtime ID Description
Fast Yes No
Persistent No Yes
Unique Globally Under container

Every Test Object may contain a runtime ID and/or a description, if both are missing there is no way to identify the control in the application being tested and the Test Object is useless (with a few exceptions).

When a Test Object is created from the application being tested it contains a runtime ID and if the Test Object is to be stored in the Object Repository (during learn or record) a description is created for this Test Object.

When running a test the Test Object has its description filled in (either from the Object Repository or from Programmatic Description) and then its runtime ID is found. Since finding the runtime ID is potentially an expensive operation the value of the runtime ID is cached so as not fetch it multiple times. However since the runtime ID may change during the test run QuickTest is careful to clear the stored value whenever a new step is run. This means that if you store the Test Object in a variable or use With the aforementioned runtime ID clearing will not take place and the runtime ID may be invalidated. If this happens you can call the RefreshObject method available since QuickTest 10 which manually clears the runtime ID.

invalidating a runtime ID

An unexpected pitfall came as a support call when a customer tried to call Exist on a Test Object returned from ChildObjects, let’s follow the chain of events with our new found knowledge of the inner workings of QuickTest.

  1. ChildObjects creates Test Objects with their runtime IDs set (the Test Objects are to be used immediately so there no point in creating their descriptions)
  2. Exist wants to check if the object still corresponds to a control in the application being tested, to do this it clears the runtime ID and tries to re-create it
    1. The description is empty so Exist fails
  3. Further down the line the customer tries to use the Test Object again and the test fails since the Test Object doesn’t have a description or a runtime ID.

The problem is that QuickTest creates a layer of abstraction above the application being tested and like all sufficiently powerful abstractions it’s leaky. We know what ChildObject does and we know what Exist does but put them together and BOOM the things you don’t know (or weren’t supposed to know like runtime ID) come leaking through and punch you in the face.

Our solution was to have Exist always return true when run on a Test Object that has a runtime ID but no description, we feel that this is correct behaviour since you just got the object from the application using ChildObject, obviously it Exists otherwise it wouldn’t have been returned.

An alternative solution could have been to make the objects returned from ChildObject create their description, however that would slow down all tests that use ChildObject for the benefit of the vanishingly small number of tests that check for existence.

The best way to avoid the problem in the first place is to use objects created by ChildObject as soon as they are created and before anything changes in the application being tested.


1K answer

27 09 2017

Today my most up-voted stackoverflow answer reached the 1K upvote mark.

screenshot of question

If all I had ever done in stackoverflow was to answer this one question[1] I would be in the top 4% of users.

I’m not sure how this makes me feel… In the beginning stackoverflow was a magical place were your questions were instantly answered and one could find questions to answer just by going to the front page.

Now just going to the front page looking for an interesting question to answer is usually a futile experience. As a result, getting involved in stackoverflow now (and gaining enough reputation in order to do meaningful things), is getting progressively harder. Just recently a co-worker contacted me in order to help create a tag for one of our products since nobody in their department had enough reputation to do so.

More and more I hear anti-stackoverflow sentiments, people complain about their questions being closed for insufficient reasons and that the standards of answers are declining.

I hope that the stackoverflow team are able to keep the site relevant and useful while coping with the curse of too much(?) success.


1. Not to mention the fact that I don’t think this question still belongs in stackoverflow, it’s not really programming related and would be a better fit for superuser.com (which didn’t exist when the question was asked) 


The code/data duality

6 01 2016

One often wants special code to run the first time a function is invoked. In C++ the naïve way to do this is using function-static variables.

Consider a function that returns a random number. For nostalgia’s sake we want to use rand  (which needs to be seeded via srand before the first use). We may do something like this:

#include <cstdlib>

int random(int max) {

       static bool initalized = false;

       if (!initialized) {

              srand(time(nullptr)); // seed the random generator once

              initialzed = true;

       }

       return rand() % (max+1);

}

When I was in university, towards the end of the previous millennium, we had to learn VAX assembly (not the most useful skill I’ve ever picked up). That was when I was introduced to the concept of self modifying code. The crux of the matter is pretty obvious in hindsight, code and data aren’t different things, in the end everything is software is bits and bytes. This means that we can modify the code of the program as simply as modifying variables.

I don’t remember my assembly and I’m assuming that anyone reading this either:

  1. Doesn’t know/remember assembly
  2. Doesn’t need me to explain about code re-writing

So I’ll just invent a simple stack based assembly language since I can’t be arsed to re-learn assembly.

If we take the random function above and translate it to pseudo-assembly we would get something like:

# randomInitialized
0x000DAF00:  0x0  # initialized to zero at compile time
# random
0x000DAF04loadAddress randomInitialized
0x000DAF08branchNotZero randomInitizliedmainFlow
0x000DAF0Cload 0 # first run
0x000DAF10call time
0x000DAF14load 1
0x000DAF18storeAddress randomInitialized
0x000DAF1Ccall srand
# mainFlow
0x000DAF20: increment # max is currently on the stack
0x000DAF24: call rand
0x000DAF28: modulo # rand() % max + 1
0x000DAF2C: return

This is pretty straight forward mapping of the C[++] code to assembly and it has the same drawbacks. We perform a comparison every time the function is run (!initialized) although it almost always has the same outcome. Another deficiency of the code is more pronounced in the assembly version, a lot of code is skipped over for most calls which works against the instruction cache.

What we would really want is that every time the function is called, except for the first time, it will just do what it needs to be done. This can be achieved by modifying the code.

We compile the function to start with a jump (aka goto) to some address (outside the function) which calls srand and then replaces the jump with the first instruction we want for the subsequent function calls. The first instruction we want is  increment, for the sake of argument we’ll say that the opcode for increment is  0xADD1.

# initializeRandom
0x000DAF00load 0
0x000DAF04call time
0x000DAF08call srand
0x000DAF0Cload 0xADD1 # opcode(increment)
0x000DAF10storeAddress random
random
0x000DAF14: jump initializeRandom
0x000DAF18: call rand
0x000DAF1C: modulo # rand() % max + 1
0x000DAF20: return

During the first run the first thing we do is jump out to a memory location that precedes the function proper, then we seed the random number generator and modify the beginning of the function from being a jump to being an increment1. The initial jump is computed in advance so that we store the increment  just after the instruction pointer and then just fall through into the (now) modified function. Subsequent calls to the
function have a lean four instruction function to execute with no conditions and no branches.

random
0x00DAF14: increment # this is now the first opcode
0x00DAF18: call rand
0x00DAF1C: modulo # rand() % max + 1
0x00DAF20: return

There’s no need to waste space on a static variable, the code is more cache friendly and (at least in my made up assembly) smaller.

So if everything is so good why isn’t this used in practice? OK so high level languages don’t give you direct access to the code parts of your program but the compiler could generate such code, right?

Well I understand next to nothing about compilers but I’m pretty sure that multiple cache levels at least will make things unpractical (not to mention branch prediction).

The most obvious problem with this example is that it’s horrendously thread unsafe.  I suppose that some of the readers have been tearing out their hair from the get go, the original C++ function with the static variable was just as unsafe. An unprotected shared variable could be modified different threads simultaneously which is a data race and undefined behavior (starting with C++11).

As an aside I would like to mention that C++11 introduced “thread-safe function local static initialization”  so a better implementation of random would be:

#include <cstdlib>
int random(int max) {        
    static bool unused = ([]{// define and invoke a lambda that
        srand(time(nullptr)); // seeds the random generator
        return false;
    })();

    return rand() % (max+1);
}

Here I’m depending on the fact that a it’s the compiler’s responsibility to initialize a static variable is only once in a thread safe way. The static variable here is a bool but it’s never really used, all we need is the side effect when creating it (does anyone what to submit a proposal to allow static void variables?).

In most mainstream compiled languages, the code doesn’t have access to the generated machine code. Thus most programmers nowadays have a mental divide between code and data (Lisp programmers, feel free to gloat now). However JavaScript, as a scripting language  with a functional orientation, brings the code/data duality back together again.
Since functions (code) are objects, self mutating code is back in business. Luck would have it that JavaScript is single threaded (mostly) which allows code to mutate in a thread-safe way.

Consider, for example, a wrapper around a WebSocket.
After creating a web-socket it’s not usable until the connection is established. Due to the single threaded nature of JavaScript this means that you have to relinquish control of the thread before using the object. Say we want to store all outgoing messages until the socket is opened and then send them, one way to achieve this would be like this:

function Socket(address) {
    this.socket = new WebSocket(address);
    
    var queue = []; // captured by 'send' and 'onopen'
    this.send = function (message) {
        if (this.socket.readyState !== WebSocket.OPEN)
            queue.push(message);
        else
            this.socket.send(message);
    }
 
    this.socket.onopen = function () {
        // send queued messages
        queue.forEach(msg => this.send(msg));
    };
}

Now let’s see how the same thing could be achieved with self modifying
code:

function Socket(address) {
    this.socket = new WebSocket(address);
 
    var queue = []; // captured by 'send' and 'onopen'
    this.send = message => queue.push(message);
 
    var self = this;
    this.socket.onopen = function () {
        // send queued messages
        queue.forEach(msg => this.send(msg));
        // replace the 'send' message
        self.send = function (message) {
            this.socket.send(message);
        };
    };
}

The send function now has two instances, before the socket is fully open
and after it is open. But wait, what about after the socket is closed? For some reason sending on a closed socket outputs an error to the console but does not throw an exception. We can modify this behaviour like this:

this.socket.onclose = function () {
    // replace the 'send' function yet again
    self.send = message => {
       throw Error('Sending on closed socket: ' + message);
    }
};

Now we see that code is can be more complex than having two different states, it can be a fully fledged state machine. Admittedly, for most code it is a state machine with only one state, no input to the code modifies the code itself. However it may be useful to keep in mind that the code itself can model the problem space in addition to the data and data structures.


1. In real life the instructions aren’t necessarily the same length but you get the idea


Work blog post – Container objects in UFT

5 11 2015

As both my regular readers have probably noticed (hi Mum! [who am I kidding, even my mother doesn’t read this]) the frequency of my posts have gone down from about once a month in the beginning to closer to twice a year. This is a combination of not having anything interesting to say and life not leaving me with much time to say uninteresting stuff.

Well at work they have funny standards to what can be considered interesting and one such subject is adding container test objects to web tests in UFT.

image from the post

It even has images!

This feature was actually implemented in UFT 12.02 (released last year) but there wasn’t enough time to sufficiently QA it and therefore the feature was undocumented and only used by a few beta customers. Starting with UFT 12.50 it’s finally an official, documented feature which is the first step to benefiting our customers. Step two is to have someone actually use it which is where the blog post comes in…